Do you often play Minecraft? If your answer is YES then you must know which is the best Optifine Settings. There are tons of Minecraft players who have been having trouble optimizing Optifine Settings for an uninterrupted experience and if that’s you then look no further as we have got you everything covered here.
Table of Contents
In this guide, we will not only reveal the best Optifine Settings for FPS boost but also explain what Optifine is, how to optimize it, and how to install it. Without any further ado, let’s go through the guide.
What is Optifine?
Optifine is nothing but a Minecraft mod allowing its millions of fans to located advanced settings of the game, which normally can’t be accessed in the normal version of Minecraft. Everybody knows the mod version has plenty of things that we don’t see in the normal version of the game and Optifine is no different.
There are tons of Minecraft fans who reported that Optifine is the best option if you want to enjoy Minecraft smoothly. What makes Optifine way popular among the fans is it does not require forge to use shaders in Minecraft. Apart from this, it also allows you to tweak the graphical analysis, render quality, shadow quality, and more.
Before we unleash the best Optifine settings for FPS boost, let me teach you how to install the latest version of Optifine.
How to install Optifine in 2023?
To install Optifine, you need to have the downloaded file of the mod. If you don’t have the downloaded file then you can download it from its official website. Make sure to download the latest version of the mod.
Once Optifine downloaded, follow the onscreen installation instruction to get the mod installed on your device.
Best Optifine Settings For FPS Boost
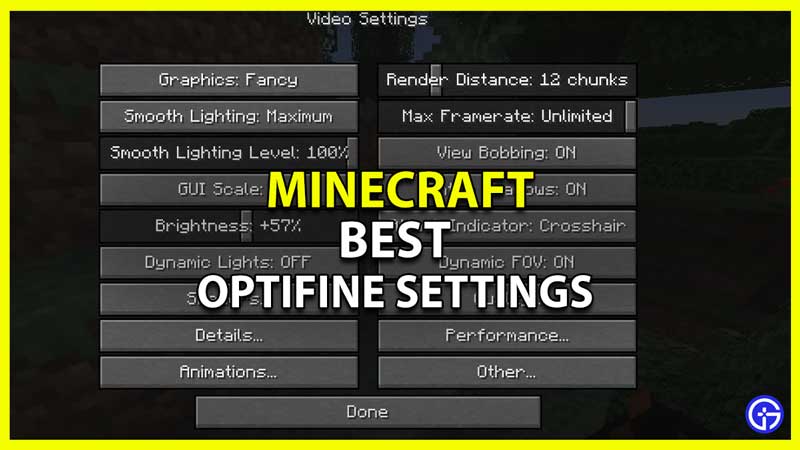
Once it is installed, select Optifine from the drop-down menu and run it. After launching the game, you will need to go to “Options” and then go to “Video Settings” to apply the best possible Optifine Settings for FPS.
When you do this, a new page will appear on the screen as shown in the picture below. Before we tell you the best Optifine Settings, let me tell you that this setting might not work for you because it is different for computers having better FPS on certain settings that we are telling here.
Here’s a step by step guide to apply the best Optifine Settings for FPS Boost in Minecraft:
Graphics:
There are three options in Graphics — Fast, Fancy, and Fabulous.
- Fast: This option is best for frame rates
- Fancy: This option is for those who want to play it on a high quality
- Fabulous: This option is a bit better than Fancy.
I recommend you to use Fast and Fancy over Fabulous.
Smooth lighting:
Smooth Lighting is an option that adds lighting to the game. This is surely the best option because it will directly impact your FPS if you have it off. In Smooth Lighting, there are three option to choose from — Off, Minimum and Maximum.
- Off: It makes the game faster than ever.
- Minimum: It balances both quality and FPS.
- Maximum: It will make the gameplay a bit slower.
Dynamic Lighting:
If you have your Dynamic Lighting Off, you would not be able to see anything on your screen as you can see in the below picture.

But if you put it on fast mode, it lets you light the world with the help of your touch that you have in your hand.
In Dynamic Lighting, there are three options to choose from — Off, Fact, and Fancy.
- OFF: No dynamic lighting.
- Fast: Dynamic lighting with 500ms
- Fancy: Real-time dynamic lighting with a latency of 0ms.
If you want us to recommend the best Optifine settings then I highly recommend using either Fast or OFF.
Shaders
If you really want to get the FPS then make sure to have the Shaders option Off. If you have it ON then it is most likely that you will encounter crashing and other issues.
Details:

Upon clicking on the Details tab, you will be greeted with a page as shown on the above page. There are multiple options to go through but instead of going to all options, let’s directly talk about the best FPS settings.
- Cloud: OFF
- Trees: Fast
- Sky: OFF
- Sun & Moon: OFF
- Fog: Off
- Translucent Block: Fast
- Dropped Items: Fast
- Vignette: Fast
- Entity Distance: 100
- Cloud Height: OFF
- Rain & Snow: OFF
- Stars: OFF
- Show Capes: OFF
- Fog Start: O.8
- Held Item Tooltip: ON
- Swamp Colors: OFF
- Alternate Block: OFF
- Biome Blend: Off
Animations:
Once you are done doing the settings as we have mentioned above, click on the ‘Done button and go to Animations. In the Animation tab, if you turn all of the options off, the game is going to look very ugly. Turning off all of these options with provide the best FPS but it is your preference to either get low FPS or play the ugly game.

The only thing that I would recommend doing in this tab is going ahead and click minimal for particles.
Quality:

When you click on the Quality tab, you will see a new window that will appear on the screen, which has multiple options. Without investing much time explaining each and every option shown in the above picture, let’s directly teach you the best FPS settings.
- Mipmap Levels: OFF
- Anisotropic Filtering: OFF
- Emissive Textures: OFF
- Better Grass: OFF
- Custom Fonts: OFF
- Connected Textures: Fast
- Custom Sky: OFF
- Custom Entity Models: OFF
- Random Entities: OFF
- Better Snow: OFF
- Custom Colors: OFF
- Natural Textures: OFF
- Custom Items: OFF
- Custom GUIs: OFF
Performance:

When you go to the Performance tab, you will a new window appearing on the screen of your PC. When you go there, you will have to do the following settings for the best FPS.
- Render Regions: ON
- Smart Animations: ON
- Smooth FPS: ON
- Chunk Updates: 1
- Laxy Chunk Loading: ON
- Fast Render: ON
- Fast Math: ON
- Smooth World: ON
- Dynamic Updates: ON
Once you are done doing these settings, you will have to head to the last tab, Others.
Others:
When you go to the Others tab, the first thing you must do is to turn on Autosave because it saves your game every certain amount of time that you fixed in the settings, protecting you from the losses due to crashing issues. Make sure to set a small duration like 10 or 12 minutes in the Autosave tab.

Apart from the Autosave tab, here are the following settings that you need to do it manually.
- Lagmeter: OFF
- Show FPS: OFF
- Weather: ON
- Fullscreen: OFF
- Screenshot Size: Default
- Debug Profiler: OFF
- Advanced Tooltips: OFF
- Time: Default
- Show GL Errors: ON
- Fullscreen Model Current.
These are the recommended settings to boost FPS in Optifine. If you really want to have more FPS in Optifine then you must apply the above-mentioned settings because we have already tried it on a couple of PCs. These Optifine Settings will not increase your FPS but also reduce issues like crashing or lagging.
That’s everything you need to know about Optifine best things