Discord Reactive Images is the easiest way to become a Virtual YouTuber, or more commonly known as a VTuber. Discord Reactive Images uses at least 2 PNG images for your live streams. If you’re planning to look into this, we have covered all the relevant information to get you started in our Discord Reactive Images Guide.
How to Use Discord VTuber Reactive Images for OBS & XSplit?
Installing and setting up Discord Reactive Images is quite easy to set up than you would imagine. So let’s look at the below simple steps:
- Firstly, you need to keep 2 PNGs ready with you.
- These 2 PNGs will be your Discord VTuber avatar.
- One for the talking animation and the other for idle.
- If you want to top up a notch, then you can also make GIFs of your avatar to add more idle animations like breathing, blinking, and more.
- Now go to your Discord User Settings.
- Click on the Appearance option located under the App Settings Tab.
- Scroll down to Advanced and enable Developer Mode.
- Now we will get our Discord VTuber overlay up & running.
- Now you need to download Discord StreamKit for either OBS or XSplit, depending on the software you use.
- Like many users, we are using OBS, so we will show the setup in OBS for now.
- Discord StreamKit is also available for YouTube Integration & Twitch Integration.
- So click on Install for OBS.
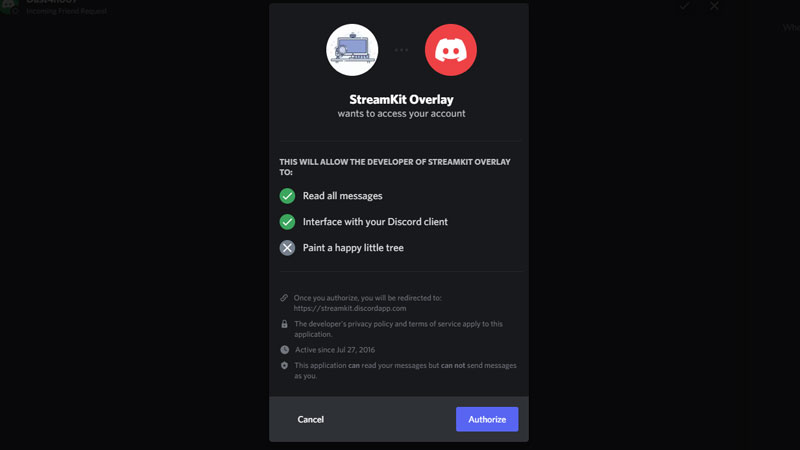
- Now, StreamKit will ask you for permission to access your discord account.
- Authorize the necessary permissions.

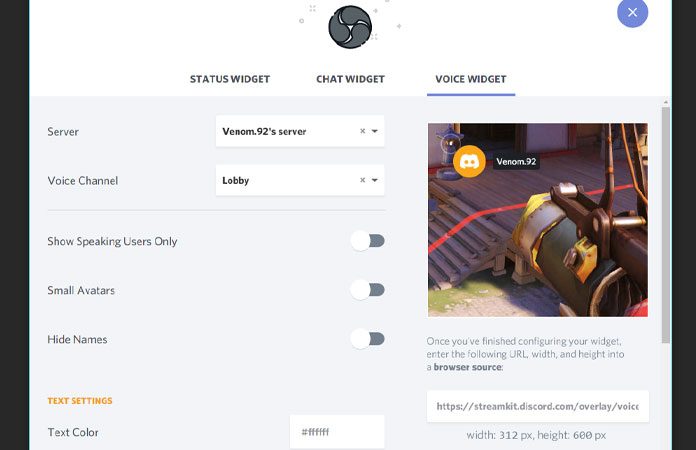
- Now, in the browser, you will get the settings for StreamKit overlay.
- Click on Voice Widget.
- Select your desired Server and Voice Channel from here.
- Copy the link generated under the image on the right-hand side.

- Open OBS and set this link as your Browser Source.
- To do this, click on the + sign on the right side of Sources in the OBS dashboard, and select BrowserSource.
- Add a new Source name, paste the link in URL in Browser Source Settings.
- Set your desired resolution. Depending on how your Reactive Image is displayed by end of this guide, you may have to adjust this resolution to fit your avatar better within the frames.
- Under the resolution settings, you will find Custom CSS.
- We have to put custom code here for our Discord Reactive Images to work.
- But we can use the code created by talented VTuber Junh.
- You can go to his website and follow the steps he mentioned there to easily generate the code for you.
- He also included a “Not Speaking Brightness” which will make your Reactive Image dark when you are not talking.
- If you don’t want this and always want to keep your Avatar fully visible, then just adjust the slider to 100 brightness.
- Once done, click on Generate to get your code.
- Copy and paste this code to Custom CSS in Browser Source Settings of your Streamlabs OBS.
- You can follow almost a similar step for XSplit, the change is that instead of OBS you will set everything up in XSplit.
- Once you have done, you have successfully completed the setup of your Discord VTuber Reactive Images for OBS & XSplit.
How to Set Up Discord VTuber Server With Reactive Images?
Here are the easy steps to start using Discord VTuber Reactive Images while streaming:
- Once you have completed the setup using the steps mentioned above, go to your Discord.
- Go to the Server and Voice channel you selected before in StreamKit overlay settings.
- Go to User Settings.
- Click on Voice & Video, under the App Settings.
- From the Voice Settings, make sure to check if your microphone is set as your input device.
- Now your Reactive Images will start working, and you may call yourself a Discord VTuber now.
That’s everything you need to know about Discord Reactive Images to become a VTuber easily. While you are here check out more of our Discord Guides for interesting topics like fix Discord PFP Blurry issue, how to Set Gif Profile Pic & Profile Banner Gif. You might also be interested in our latest Profile Customization Guide.

