As you progress with the North Lomei Prophecy & Labyrinth in Zelda: TOTK, you would need to solve the North Lomei Castle’s top floor. Once you have cleared the Labyrinth on the surface, the Castle’s top floor in the sky will open up. You have to complete the labyrinths on the Surface, Sky, and the Depths respectively. Contrary to its name, the top floor doesn’t explain about completing or solving any challenges. Further, no in-game details explain how to reach the inner terminals or navigate through the maze. But that’s the whole point of a labyrinth, right? Don’t worry, check out our guide on how to solve the North Lomei Castle top floor in Zelda: Tears of the Kingdom to find out all terminals.
North Lomei Castle Top Floor in Tears of the Kingdom (Terminals)
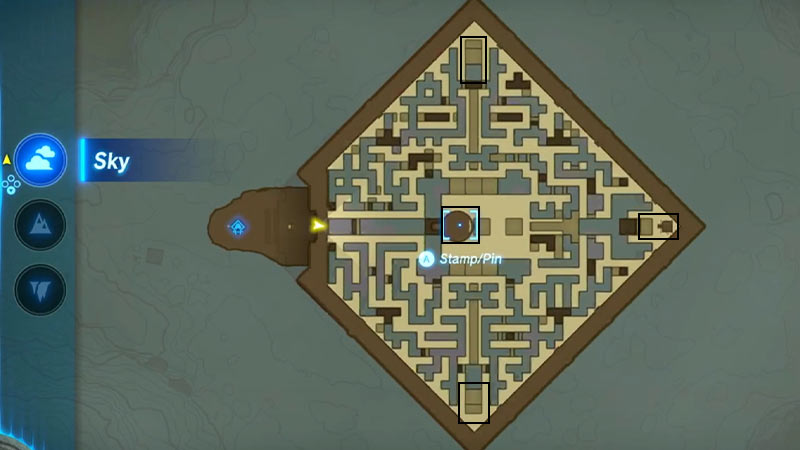
To complete this labyrinth floating in the skies, activate the four terminals hidden within a maze in Tears of the Kingdom. For that, you can use a Paraglider and a map for navigation. As you make your way through the hidden terminals in TOTK, use the map to pin/stamp these terminals. Don’t worry about the fall damage or gliding downwards as the strong winds will help you out in this case.
Follow the below steps to complete the North Lomei Castle top floor in Zelda TOTK:
- Firstly, use a stamp or pin to mark the terminal of this labyrinth. Refer to the above image for all hidden terminal locations inside North Lomei Castle.
- Use a Paraglider to glide straight into the strong winds that will take you in an upwards direction.
- As you glide upwards, head straight to take a right and a sudden left.
- Then, glide left to reach your first terminal. The exact map coordinates for this terminal are as follows:
- (0826, 3534, 1064)
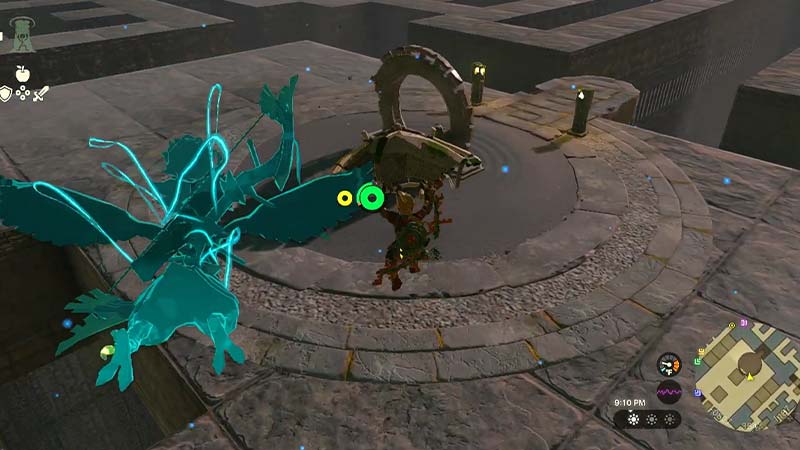
- You have to examine and interact with the terminal.
- For the next terminal, mark the terminal’s location to the south of your first pin or stamp on the map.
- Make your way through the bottom of the map to reach the second terminal. Its exact map coordinates are as follows:
- (-0825, 3419, 1064)
- Now, mark your pin to the extreme right of the map in the east direction.
- If your sense of direction is slightly wavering, keep on using the map while gliding.
- Once you reach the far-right end of the map, you can find the third terminal. Here are its exact map coordinates:
- (-0710, 3534, 1064)
- For the fourth hidden terminal, mark the location to the extreme north.
- Similar to navigating your way to the previous terminals, locate the fourth hidden terminal by using a map. Its exact map coordinates are as follows:
- (-0824, 3649, 1064)
- Soon as you interact or examine this terminal, a cutscene will be triggered showcasing the last panel. This panel will appear on the top of the labyrinth.
- Due to the strong winds blowing inside the labyrinth, you can reach the top of the maze in no time by gliding.
- Finally, examine the final terminal to solve North Lomei Castle’s top-floor labyrinth in TOTK.
Note that you can head to any of the four terminals in any order irrespective of the above sequence. Once you have completed the North Lomei labyrinth in the skies, dive into the deeper Depths region to complete the quest.
That’s all about the North Lomei Castle top floor in Zelda Tears of the Kingdom. If you liked this guide, check out our more guides to find all Bargainer Statue locations, how to unlock Gerudo Highlands Skyview, and more Legend of Zelda: TOTK Guides right here on Gamer Tweak.