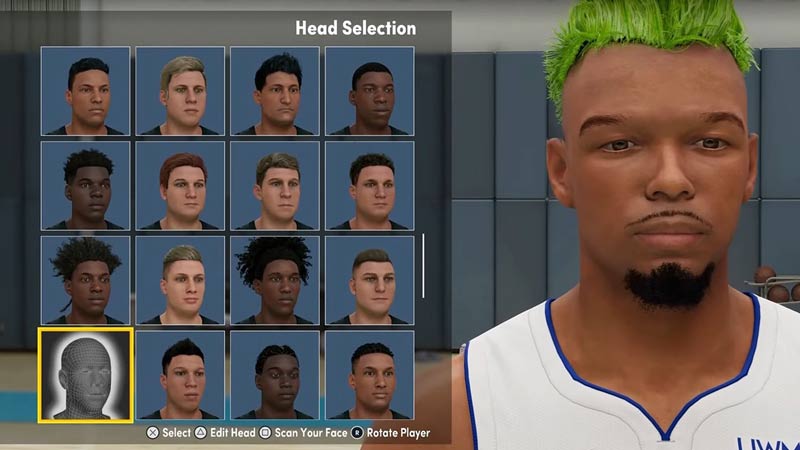
NBA 2K22 has given the player base to create the appearance of their MyPLAYER character as however, they want. You can choose from a wide range of Presets given by NBA 2K22 or use another method which I will be explaining later. Right now I will show you how to change your MyPLAYER’s Face and Appearance.
How to Change MyPLAYER Face in NBA 2K22

Changing the Appearance of your MyPLAYER character is pretty simple. From the Home Screen, Pause Menu, or Settings Screen, go to the MyPLAYER tab and select it. Under that there will be multiple tabs, click on the Appearance tab. You are presented with a screen of many Head Types. Select one of them of your liking and proceed to edit them. When you do select a Head Type, you will be given the option to edit facial features like Hair, Eyes, Nose, Skin Color, etc. Each facial feature has a lot of editable styles so make sure to go through them all before jumping to the next style. Once you are done with making your MyPLAYER’s Appearance, click on the Save button.
How to use a Face Scan for MyPLAYER in NBA 2K22
There is another way you can change your MyPLAYER Character, this method allows you to put your own face on to your MyPLAYER Character. NBA 2K22 allows the players to Face Scan and apply that to the MyPLAYER Model. To get a Face Scan you will need to first get the companion app of NBA 2K22 on your Mobile Phone from the App Store or the PlayStore. Once you download the app and start it, the app will ask you to connect the app to the Platform you use to play NBA 2K22 on. Select the correct Platform, Region, and log in your details into the app.
Once that is done the app will have three buttons on the Main Screen, one of them is Face Scan. Click on it and it will open up a tutorial section where you will have to scan your face. The scanning process is pretty simple as the app will take a 180° view picture of your face.
There will be an Oval on the screen, you will have to fit your chin and forehead in the bottom and top of the Oval respectively. Once the alignment is done start the scanning process. The app will tell which parts of the face are scanned and which are not, it will take a total of 13 pictures and will process 14 pictures. It takes 14 pictures as you start the scanning process from the middle and then go left to right. In that process, the Middle Photo is taken twice. Check if all of the pictures were scanned correctly. If satisfied then click on the Upload Images or Retake Images if you aren’t happy with pictures.
Also Read | NBA 2K22 Face Scan Guide
Applying the Face Scan to MyPLAYER Character
When the Face-Scanning process is done then go to your NBA 2K22 game and from the steps of accessing your MyPLAYER Appearance got to Appearances. Under Appearance, there should be a Face Scan Head type. Select it by clicking the Scan Your Face option and then Check for Head Scan Data. It will start scanning for the Face Scan and will import the Face Scan you just made. Once the process is done an icon will appear, this icon can come in 3 colors which are green, yellow, and red. The 3 colors indicate the quality of the Face scan green being the best and red being the worst. Just like that, your Face Scan will be applied to your MyPLAYER Character.
Things to Keep in Mind
If your MyPLAYER Character doesn’t look like the Face Scan you made then edit by changing something like Skin Color or Hair. This will correct the Head to match the Face Scan. Selecting an option that is not the default one will give you the proper Face Scan look. When you are taking the Face Scan, make sure your Camera lens is clean. Even if the quality of the face Scan is low, this gives the best look possible. Also, before taking the Face Scan I suggest tidying up your face. Trimming, shaving, applying to make-up, etc can make your Face Scan that much better.
This was all about how to Change MyPLAYER Face and Appearance in NBA 2K22. Hopefully, this guide has helped you in customizing your MyPLAYER. You can also check our guides on Shot Meter Settings and Unlocking Penthouse in NBA 2k22.

