Many planets you will come across in Starfield have their unique habitat and analyzing it with the Scanner is essential for further research. You will come across the Hand Scanner in the Kreet Research Base while completing One Small Step. The Hand Scanner in Starfield will help you locate different objectives, materials, etc in Starfield. Not to mention, you will come across many points of interest on different planets that you might wish to check out. In addition to that, the Scanner can also detect anomalies on different planets. While the Scanner won’t provide heavy information to players, it will help guide you accordingly through the habitats. So if you are wondering how to use it effectively and also follow scanner anomalies, then here is a guide you should check further.
How to Use Hand Scanner in Starfield
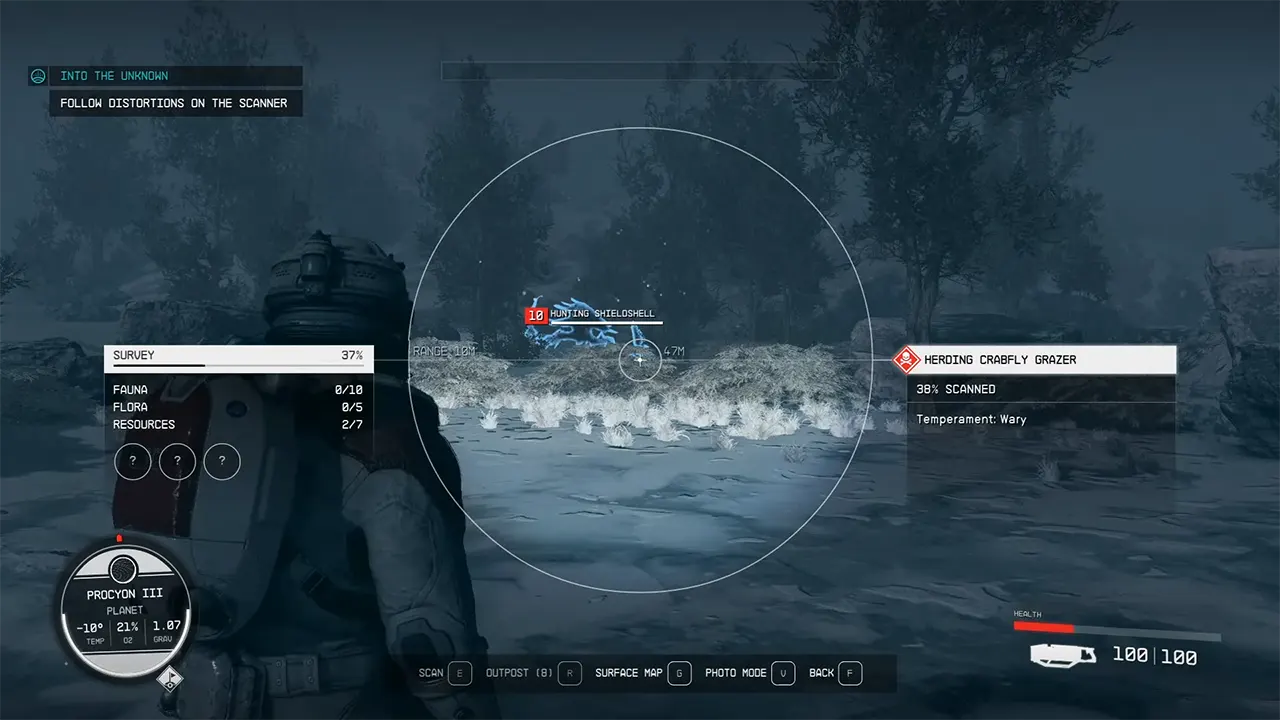
Players can use the Hand Scanner in Starfield by pressing the F key on the keyboard or the LB button on your Xbox Controller. This will bring up the Scanner’s HUD with which you will be able to use it accordingly. The circular scanner in the middle will help you detect different points of interest around your surroundings. Here are all the different ways through which you can use the Hand Scanner in Starfield:
Scan Resources
You can use it to discover new resources and scan them to get more information in the game. After which the information about the specific resources will be available on the right-hand side of the circular scanner. To scan the resources, players can press A on their Xbox Controller or E on the keyboard. On the left-hand side of the HUD, you will see the number of resources, flora, fauna, etc. discovered through the survey. It is worth keeping in mind that each resource needs to be scanned more than once to be completed.
Markers & Mission Trail
Along with the flora and fauna, you will also come across various markers which you can track down with the HUD. Another best way to use it would be to see Mission Trail if you have an active mission in the game. You can follow the trail using the Hand Scanner to come across the mission objectives accordingly in Starfield.
How to Follow Scanner Distortions in Starfield (Scanner Anomaly)
Along with scanning resources and points of interest, the hand scanner can detect various anomalies in Starfield. These anomalies are identified by distortions or glitching on your circular scanner in the game. After landing on planets with such anomalies, you can follow and investigate them accordingly. One of the main story missions, Into The Unknown, will require you to follow this distortion on the planet of Procyon III. Here are the steps you can follow to continue
- Players can open up their scanner and track down any distortion on the HUD in Starfield.
- You can do a full turn at first to find the exact direction of the anomaly.
- Once you see your circular scanner glitching follow the directions.
- You will have to follow the direction until it stops, after which locate it once again and head towards it.
- The closer you get to the anomaly, the distortions will keep getting worse.
- It is also worth listening to sound because as you get closer the scanner will make high-frequency sounds alerting you about the anomaly.
On Procyon III, following these scanner distortions will lead you to Temple Eta in Starfield. Likewise, with the expanse of planets the game has to offer, there are many such abnormalities that you can explore.
That’s everything covered on how to use Hand Scanner in Starfield. For more interesting ones, check out our shielded cargo and unlock advanced locks, and for more useful guides look out for our dedicated Starfield section, right here on Gamer Tweak.