Who doesn’t love modifying and customizing their weapons in Tarkov? But then again, there are many who find it challenging while doing the Mechanic’s questlines. The Mechanic is infamous for handing over quests that require players to modify weapons that meet his requirements. The plot is pretty much the same for the Gunsmith Part 2 quest in Escape from Tarkov. Since you’re here, you may have found it difficult to get the required attachments. Don’t worry, our walkthrough guide below will help you out!
How to Complete Gunsmith Part 2 in Escape from Tarkov
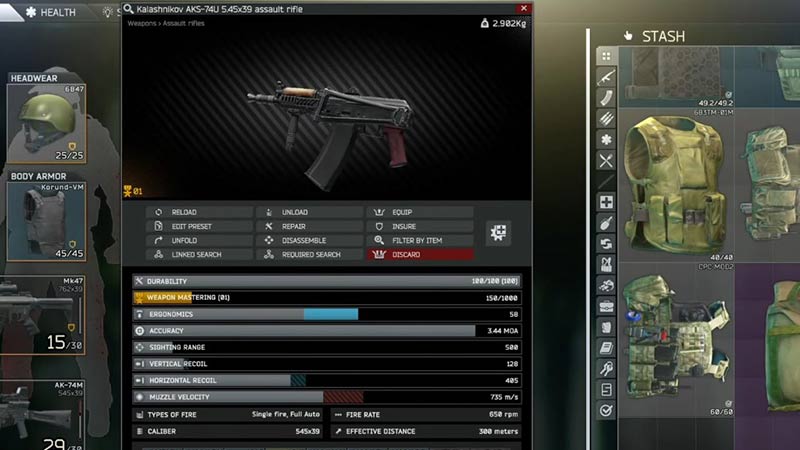
The whole objective of the Gunsmith Part 2 quest is to modify the AKS-74U to meet the Mechanic’s requirements. It is quite similar to the Gunsmith Part 1 quest in Tarkov. With that being said, here are all the requirements you will need to have on the assault rifle:
- Zenit B-11 Handguard
- 60 Durability
- Over 58 Ergonomics
- Less than 550 Recoil
- 100 or greater Sighting Range
- A Magazine with a 60 Round Capacity
- Weighs 3.5 kg or less
- 6 or fewer Cells
To sum it up, the Gunsmith Part 2 quest in Escape from Tarkov will require you to:
- Find specific Attachments for AKS-74U
- Assemble the AKS-74U
- Hand it over to the Mechanic
Also, you will need to be on level 5 in order to get this quest in the first place. If you want to do this task from the Mechanic in a breeze, then you will have to know the location of all the AKS-74U parts.
AKS-74U Attachments Location in Tarkov Gunsmith Part 2
Following are the attachments that you will need to find in the Gunsmith Part 2 quest in Tarkov:
- AKS-74U Zenit B-11 Handguard
- AK Zenit RP-1 Charging Handle
- KAV Vertical Foregrip
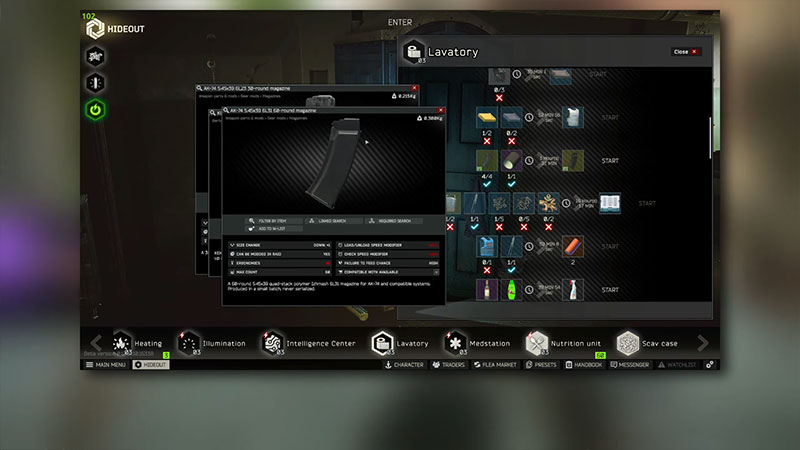
- AK-74 5.45×39 6L31 60-Round Magazine
Some of the AKS-74U parts are quite easy to get. The Zenit B-11 Handguard and AK Zenit RP-1 Charging Handle can be purchased from Skier. The third AKS-74U item – the KAV Vertical Foregrip – can be purchased from Peacekeeper for $32.
Now, let’s talk about the final attachment – the 6L31 60-Round Magazine. This item is becoming increasingly difficult to find for Escape to Tarkov players. One way to get this magazine is from the bodies of Raiders and Scavs. However, there is an easy way to do it too.
You can simply go to Lavatory Level 2 and trade with Prapor for the 60-round. You will need to hand over four 6L23 30-round magazines, one KEKTAPE duct tape and a Flat Screwdriver to get the 6L31 60-Round Magazine in return.
How to Assemble the AKS-74U in Escape from Tarkov
Now, comes the final part – assembling the AKS-74U in Gunsmith Part 2. Firstly, you’ll have to take off the current handguard. However, don’t remove the gas tube along with it. Once that is done, equip the Zenit B-11 Handguard. Once the new handguard is added, you will be able to attach the KAV Vertical Foregrip as well. Finally, add the 60 round mag, the Zenit RP-1 Charging Handle and also a muzzle. Also, don’t forget to fold the gun or else it won’t fit the requirements of the Gunsmith Part 2 task.
Then, all that is left is to hand over the modified AKS-74U to the Mechanic. For all your troubles, he will reward you with:
- +2,000 EXP
- Mechanic Rep +0.01
- 15,000 Roubles
- 15,750 Roubles with Intelligence Center Level 1
- 17,250 Roubles with Intelligence Center Level 2
- 2× Capacitors
- 2× Bundle of wires
- 2× Light bulb
- Unlocks purchase of AK 100-series polymer handguard at Prapor LL1
That’s all you need to know about how to complete the Gunsmith Part 2 Quest in Escape from Tarkov. If you have learned how to do this task, then check out our Gunsmith Part 3 quest walkthrough in our Escape from Tarkov section.