Disney Dreamlight Valley is finally out now and ready for you to explore. Now you can spend your time with your favorite characters and also go on adventures with them. Disney Dreamlight Valley even allows you to take pictures of your Avatar with the characters. Players just have to use the Photo Mode and they’ll be good to go. However, if you don’t know how to use it, then don’t worry, we’ve got you covered.
How to Click & Take Pictures in Disney Dreamlight Valley?
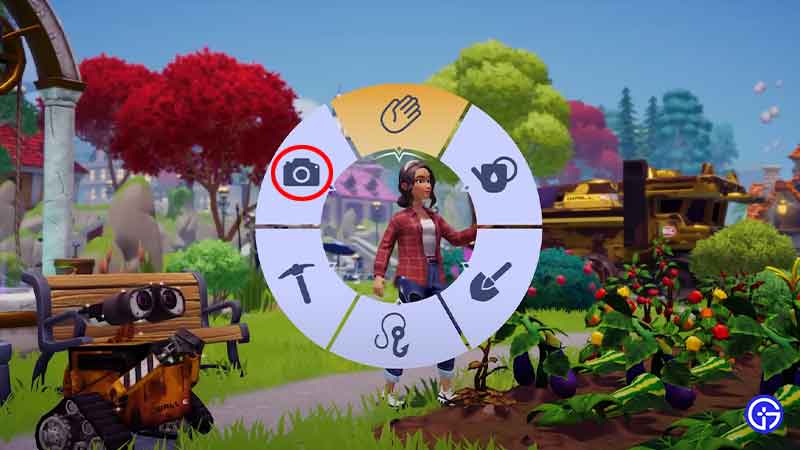
To take pictures in Disney Dreamlight Valley, players must first access the Photo Mode. And, in order to do that you’ll have to interact with Merlin and complete the given task for him. As soon as you do that, you’ll be able to access your Home, Phone, and many more things. Now that you have your phone, let’s see how you can access the camera and start taking pictures.
- First open the Tool menu by pressing RT on Xbox, R2 on PlayStation, & ZR on Switch.
- After that, pull out your phone by selecting the Phone option.
- And to use the Photo Mode click the X on Xbox, Y on Switch, and the Square button on PlayStation.
- You can even change the Camera Mode by clicking on the Bumper button on all devices.
- Once you’re ready, you can easily click the pictures by pressing X on Xbox, Y on Switch & the Square button on PlayStation.
- Also note, as of now, there are no options to save the picture of your Avatar and the Characters in-game. But you can always take a screenshot via your devices.
This is how you can use the Photo Mode and take pictures in Disney Dreamlight Valley. While you’re here take a look at how you can increase Inventory Space in the game.