In Roblox, there is a way you can make and wear our own Custom Shirts and T-Shirts. This feature has multiple advantages, the biggest one is letting you show off your creativity. Next, if you can’t find something in the Avatar shop then you can simply make and wear the outfit you like. And on top of that, you can even sell it to other players. So here is how you can use the Shirt template in Roblox to make your own shirts and t-shirts.
How to Make a Custom Shirt in Roblox
You first need to download the Shirt template from Roblox in order to use it. To do that simply:
- Go to Roblox and log in to your account where you want to make a Shirt (or T-shirt).
- Next, click on the Avatar option.
- Here, click on the Clothing option, and from the drop-down choose Shirts.
- On the right side, you will get the option to Create. Click on it.
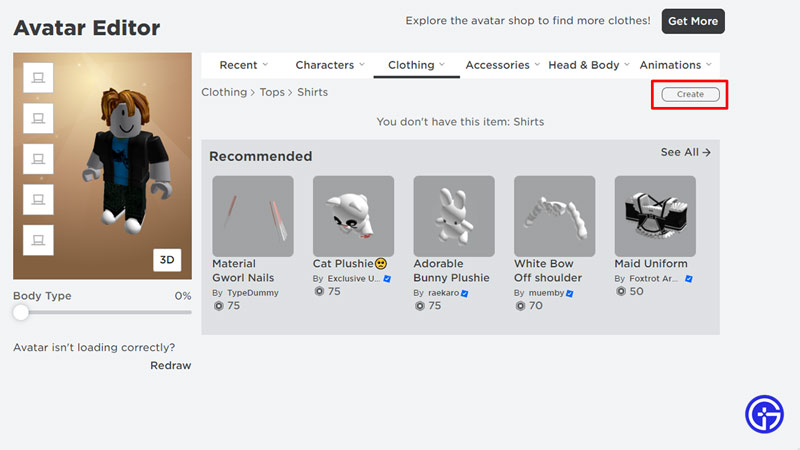
- This will take you to the My Creations page.
- To download the Shirt template you have to click on the “Click here” option next to “Don’t know how?”
- Here you can find the templates for both Shirts & Pants.
- Download this template. It should look like the image below.
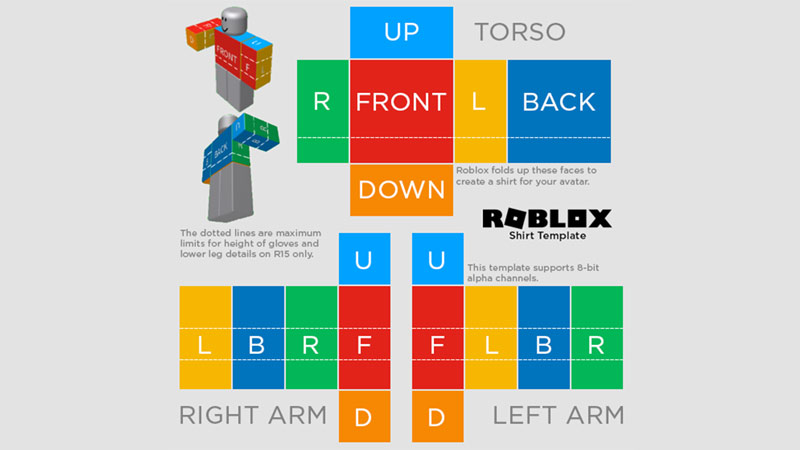
- Open it on any image editor of your choice like Photoshop or Paint.
- Edit the different faces of the Shirt as per your design choice. These faces are:
- F: Front
- B: Back
- L: Left
- R: Right
- U: Up
- D: Down
- Once you are done editing the template save the image. Save it as a JPG or a PNG file.
How to Use a Custom Shirt in Roblox
In order to use a Custom Shirt you will need at least 10 Robux for uploading it. While you can use a T-shirt for free, uploading shirts in Roblox costs Robux.
- Go to Roblox.
- Click on the Create button on the top tab.
- Next, select Manage my experiences.
- Roblox will now bring you to your Creations page.
- Click on the Avatar Items tab.
- Here, choose Shirts.

- Finally, drag and drop the Shirt you just made.
- Give it a name and description. Once you are happy with both, click on the Upload button.

How to Make a T-shirt
While you cannot make a shirt for free, you can easily make multiple T-shirts. All you need to do is make a design in a 512×512 pixel image.
- Go to the Create tab as explained above but instead of choosing Shirts. Choose T-Shirts.
- Now, upload your T-shirt here.
- Go to the Avatar tab on the main Roblox page and select the new T-shirt you made.
Now you will even appear wearing the T-shirt you made in the experiences while playing!
That covers this guide on how to make a custom shirt using the template in Roblox. If you play Roblox games on your phone then you can even do it from there. Check out our guide on how to make a shirt on Roblox mobile for it. And be sure to check out our Roblox section for more help on other similar topics.