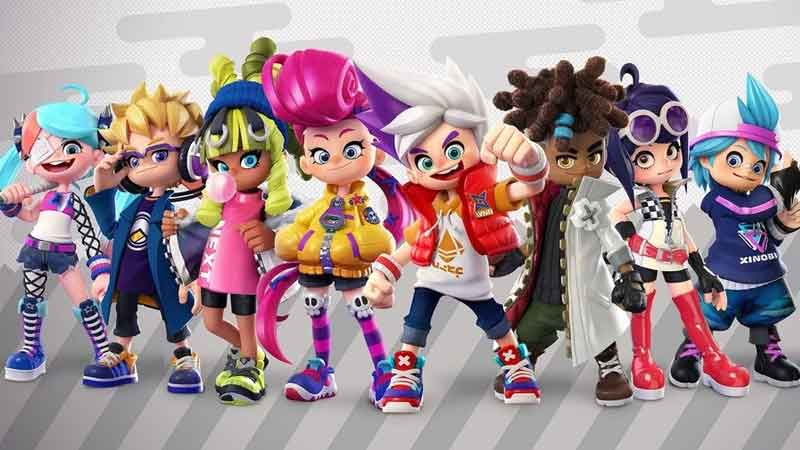
Having different characters in Ninjala is a really fun thing and gives players a different perspective on how they want their characters to project their own personalities, if you wish to change character, this guide will show you exactly how to do that. Make sure to read until the end of this guide.
Ninjala is not only about appearances but also there is a ton of action, so why not check out this guide on basic tips and tricks about Ninjala.
How To Change Characters In Ninjala
Often times players get stuck and regret the choices they make during character selection, this can arise out of plenty of different factors or maybe you just saw someone else look exactly how you’ve always imagined and wish to try it out.
Well, fear not we have written out this perfect character guide that will show you how you can change to any character you want. You are not stuck with what you choose and you can change as many times as you like.
Heck, we even recommend trying out each and every character, so bookmark this guide as all of the characters are detailed right here.
The great thing about Ninjala is the fact that the game allows you to customize to your heart’s content.
To change your character in Ninjala all you have to do is as soon as you enter Ninjala you’ll be met by every character in the game. You will meet Burton, Berecca, Emma, Jane, Kappei, Lucy, Ron, and Van.
Now the game will ask you to pick one character per account but it doesn’t stop you from customizing so, pick the one that you like and you can get into customization.
Go to the Closet and then find the Avatar menu from there, you will find two different options here. Avatar Items and Customise.
Avatar items let you change your clothes and all the accessories that you have on. This include Clothes, headgear, and facial accessory.
In the Customise section you will be able to change how your Avatar looks, these are physical attributes that you can changes whenever you feel like you wish to try out something else.
If you liked any of the characters that you met before you can customize your Avatar to look exactly like them.
We have listed down below things that you need to change to match with the Avatar:
Burton
- Headgear – Burton’s Headphones
- Facial Accessory – Burton’s Glasses
- Costume – Burton’s Attire
- Hairstyle – Short
- Face – Burton’s Face
- Hair Colour – Row 2, Option 1
- Skin Colour – Row 1, Option 2
- Eye Colour – Row 3, Option 1
- Voice – Burton’s Voice
Jane
- Headgear – Jane’s Sunglasses
- Facial Accessory – None
- Costume – Jane’s Attire
- Hairstyle – Straight & Short
- Face – Jane’s Face
- Hair Colour – Row 3, Option 4
- Skin Colour – Row 2, Option 1
- Eye Colour – Row 1, Option 2
- Voice – Jane’s Voice
Emma
- Headgear – None
- Facial Accessory – None
- Costume – Emma’s Attire
- Hairstyle – Long Dreads
- Face – Emma’s Face
- Hair Color – Row 2, Option 2
- Skin Color – Row 3, Option 1
- Eye Color – Row 2, Option 1
- Voice – Emma’s Voice
Berecca
- Headgear – None
- Facial Accessory – None
- Costume – Berecca’s Attire
- Hairstyle – Pompadour
- Face – Berecca’s Face
- Hair Colour – Row 4, Option 2
- Skin Colour – Row 1, Option 2
- Eye Colour – Row 2, Option 1
- Voice – Berecca’s Voice
Van
- Headgear – None
- Facial Accessory – None
- Costume – Van’s Attire
- Hairstyle – Short & Spiky
- Face – Van’s Face
- Hair Colour Row – 4, Option 1
- Skin Colour – Row 1, Option 2
- Eye Colour – Row 2, Option 3
- Voice – Van’s Voice
Kappei
- Headgear – None
- Facial Accessory – Kappei’s Nose Tape
- Costume – Kappei’s Attire
- Hairstyle – Casual & Short
- Face – Kappei’s Face
- Hair Colour – Row 1, Option 1
- Skin Colour – Row 2, Option 1
- Eye Colour – Row 2, Option 1
- Voice – Kappei’s Voice
Ron
- Headgear – None
- Facial – Accessory None
- Costume – Ron’s Attire
- Hairstyle – Undercut Dreads
- Face – Ron’s Face
- Hair Colour – Row 4, Option 4
- Skin Colour – Row 3, Option 2
- Eye Colour – Row 5, Option 1
- Voice – Ron’s Voice
Lucy
- Headgear – None
- Facial Accessory – Lucy’s Eyepatch
- Costume – Lucy’s Attire
- Hairstyle – Twin Ponytails
- Face – Lucy’s Face
- Hair Colour – Row 1, Option 1
- Skin Colour – Row 1, Option 1
- Eye Colour – Row 1, Option 1
- Voice – Lucy’s Voice
So here’s how you can change your character and if you have a favorite one, now you can look exactly like them. Keep in mind that everything is customizable so keep on tweaking and changing your looks to make it more appealing to you.
This is all there is to know about how to change characters and their appearances in Ninjala. Make sure to read other tips and tips about Ninjala as well right here.


