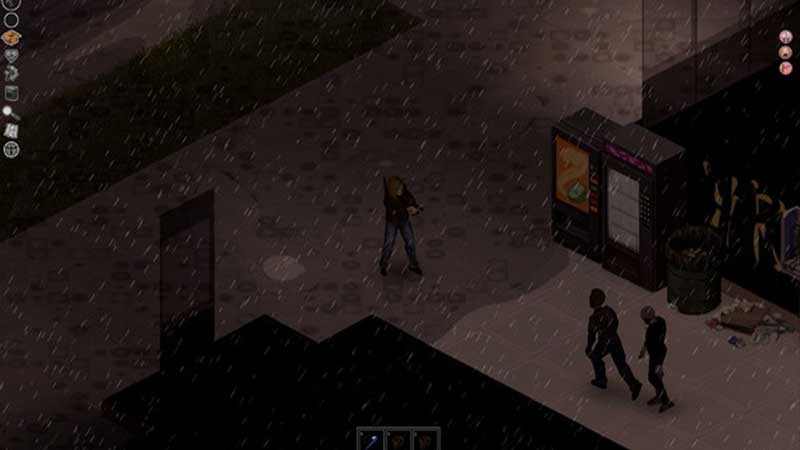
Project Zomboid is really fun when you play multiplayer with your friends, with the ability to host, play, and join servers. While this can be extremely exciting, understanding and mastering the multiplayer features of this brilliant game can be a bit of a task initially. To put an end to this dilemma, we have compiled this ultimate multiplayer guide just for you. This all-in-one guide will walk you through all of the different multiplayer functions and features.
Project Zomboid Multiplayer Guide – How to Host, Play, & Join Servers with Friends?
How to Play on a Project Zomboid Server?
In order to play multiplayer with friends on a Project Zomboid server, you need to open the Steam client application. From here, open your Steam library and look for Project Zomboid in the dropdown list of games. Once you do find the game, right-click on it and then select Properties. Once you do so, pick BETAS and then choose b41multiplayer from the options.
Next, you need to update the game (only if any updates are available). Next, simply start the game.
Once inside the game, you will need into the multiplayer options and pick the right choices. For starters, you need to decide what type of server you want to join. The first type is a Host Server. To join one of these, you will need an invitation from a Steam friend. The next type of server is a Dedicated Server. To get into such a server, you need to enter its name or IP in the Internet tab.
Once you complete these choices, you need to enter the description for certain multiplayer options.
- Server Name – Enter the name of the server you wish to join here.
- IP – Enter the server IP in case you are joining with a server IP.
- Local IP – You need not enter anything here
- Port – Enter 16261 here (The mentioned number is a default port)
- Server Password – If the server has a password, you will need to enter it here.
- Description – You need not enter anything here.
- Account Username – Enter your nickname here
- Account Password – Enter the password to your account here
How to Host a Server to Play Project Zomboid with Friends?
In order to host a server to play Project Zomboid with friends in multiplayer, you first need to make sure the game is open. Next, you need to head over to the main menu and click on Host. Once here, click on Manage Settings, then Create New Settings, then Tune your Server, and then Save. Now, click on Back and then Start.
To invite friends to this server, all you need to do is press Escape and then Invite. Alternatively, you can also invite friends via Steam.
Before you go ahead with making a server, you need to pay close attention to the allocation of RAM. We recommend a minimum allocation of 2 GB, and 4 GB for a good experience.
A simple rule you can live by is allocating an extra 200 mb for every player you plan to invite to your server. For example, if you plan on adding 5 players and you already have 4 GB of allocated memory, you will need to allocate 5 GB of RAM (4 GB + 5×200 MB = 5 GB)
Obviously, this means that hosting a server can be quite strenuous on your system. Because of this, we recommend you go ahead with a co-op server only if you have the necessary resources.
How to Create a Dedicated Steam Server?
To create a dedicated server for Steam for Project Zomboid multiplayer, you need to first open the Steam client. Once you do so, head to the Library and then select Tools. Here, look for Project Zomboid Dedicated Server. Once you do find it, right-click on it and select Properties. Next, select BETAS and then select b41multiplayer in the options. Once you do so, you need to install or update the tool.
Next, you need to configure the settings of your server. After that, you need to head into Port Forwarding. During this process, make sure to not have any Antivirus programs running in the background. Next, you need to open the following ports in both your firewall as well as router (you only need to enter it into the router if you have one):
- TCP: 16261 – 16300
- UDP: 16261 – 16300, 8766, 8767
Next, make sure to allow StartServer64.bat file in your firewall. You will find this file inside STEAMFOLDER\steamapps\common\Project Zomboid Dedicated Server\.
Next, configure startSever64.bat script and set -Xms16g-Xms16. Here, 16 indicates the amount of RAM you wish to allot to your server.
Now, run the StartServer64.bat. A console window should now appear with a bunch of lines. Here, you need to enter a new administrator password. You will need to create a new password. It is important to take care of this password and never lose it.
Once you enter the password, you will notice that the server will pause for a while. All you need to do is wait for it to complete loading. Once it finishes loading, you should see RCON: listening on port #####. If you do get this message, it means that your server is up and running.
You can now connect to the console! And that’s it. This is all you need to know about the multiplayer mode in Project Zomboid. With the help of this guide, you will find yourself easily adding, creating, or joining a server to play the game with your friends.
And now that you know how to do so, take a look at our guide on How to Activate the Debug Mode in Project Zomboid.