Valorant’s anti-cheat system, Vanguard, requires Secure Boot to be enabled. Trusted Platform Module (TPM) and Secure Boot are security technologies that let Windows 11 boot programs use a higher standard of trust and safety. For this purpose, you will need these two features to be running while playing Valorant. This not only aims to create a way to curb cheating but it also prevents unauthorized software from interfering with the game.
If Secure Boot or TPM 2.0 is disabled in Windows 11, Valorant will not launch correctly and players will get the errors VAN9001 or VAN9003.
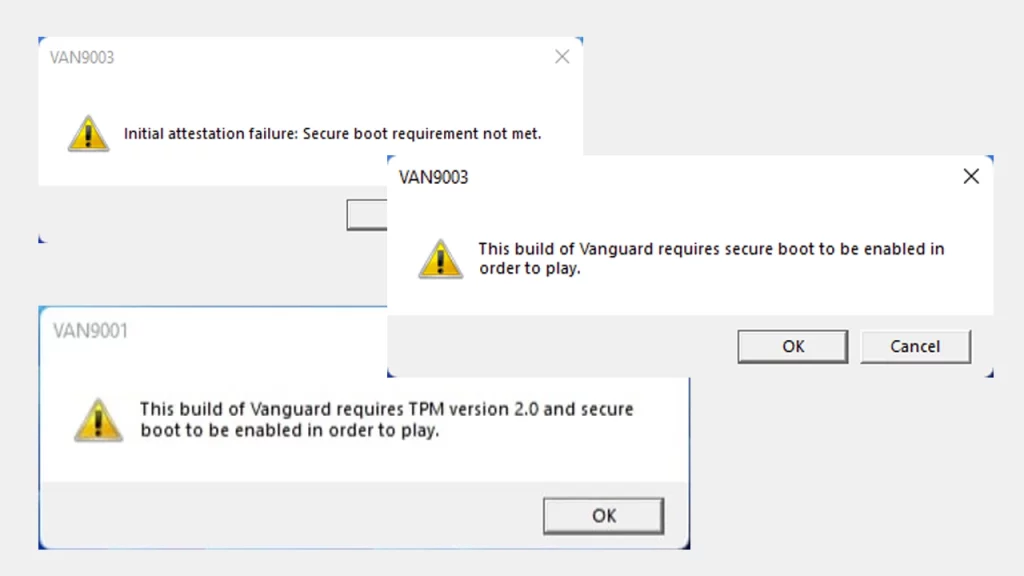
Error messages may say “This build of Vanguard requires TPM version 2.0 and secure boot to be enabled in order to play” or “Initial attestation failure: Secure boot requirement not met.”
How to Check if My System Supports Secure Boot and TPM 2.0
Before getting started with the enabling process, first, here’s how you can check if your system supports Secure Boot and TPM 2.0.
How to Check if Secure Boot is Supported
- Press the Windows key.
- Type msinfo32 and press Enter. This will open up the System Information window.
- Check the left panel and click System Summary.
- Scroll down the panel on the right and look for these values:
- The BIOS Mode value should be UEFI.
- The Secure Boot State value should be On.
- If it’s Unsupported, then it’s not supported by your hardware. Check with your hardware manufacturer to know what you can do next.
How to Check if TPM 2.0 is Supported
- Press the Windows key.
- Type tpm.msc and press Enter.
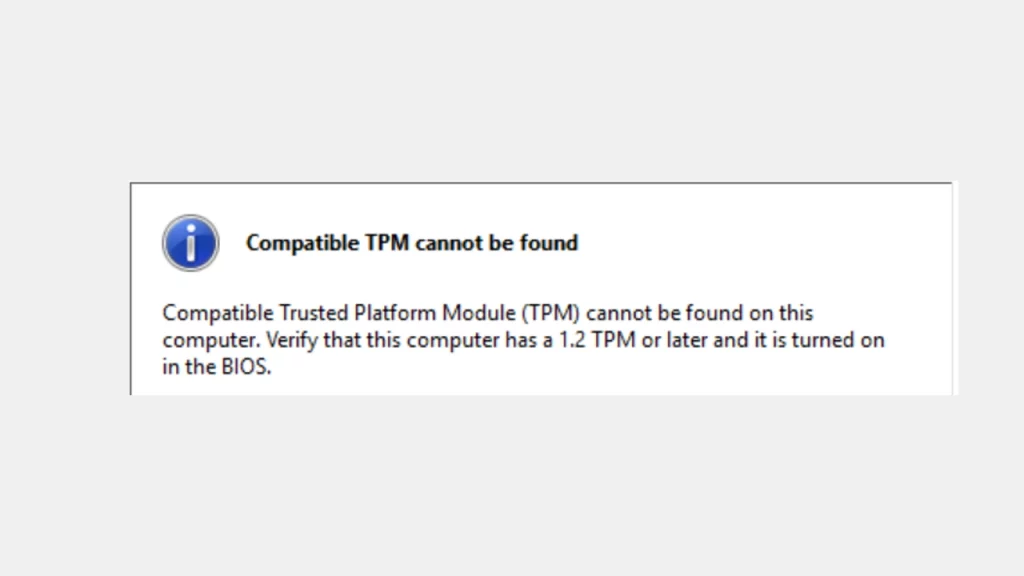
- If TPM is unsupported or not enabled, you will see “Compatible Trusted Platform Module (TPM) cannot be found on this computer. Verify that this computer has a 1.2 TPM or later and it is turned on in the BIOS.“
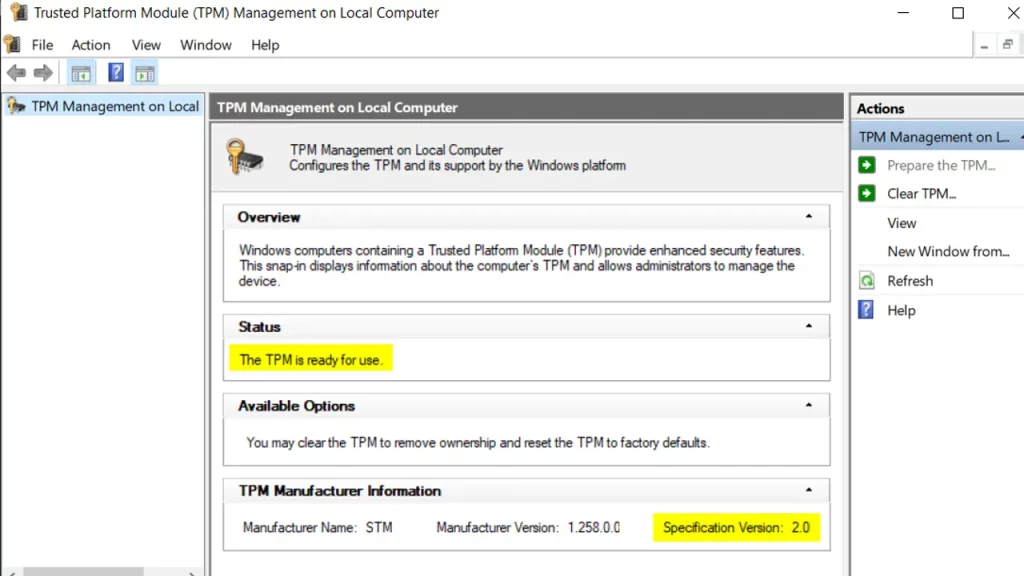
If TPM is supported, you will see The TPM is ready for use and Specification Version 2.0.
How to Enable Secure Boot for Valorant?
The exact steps will differ based on your computer, but here are the general steps to enable Secure Boot for Valorant. However, do keep in mind that if you are not sure of or familiar with BIOS and changing its settings, it’s best to contact a professional. If something goes wrong, your PC might not even start correctly, so make sure it is done by someone who has knowledge about BIOS settings.
- Access BIOS/UEFI Settings:
Restart your computer and press the key to start the BIOS setup menu (make sure to check the links provided below for the exact key to press as per the manufacturer).
- Find the Secure Boot Option:
Once in BIOS/UEFI, navigate to the Security or Boot settings section. The menu structure varies, so explore options carefully. Look for an option labeled “Secure Boot” or “UEFI Secure Boot.”
- Enable Secure Boot:
If Secure Boot is disabled, highlight it and use the appropriate keys to enable it (usually arrow keys and Enter).
- Save Changes and Exit:
Find the “Save and Exit” or similar option to save the changes and exit BIOS/UEFI. Your computer will restart, now with Secure Boot enabled.
To enable Secure Boot and UEFI for Dell, HP, Lenovo, and MSI, the manufacturers have created custom guidelines that you can check out here. You can also check Microsoft’s page to learn more about enabling Secure Boot on Windows 11.
Make sure to check for a Trusted Platform Module (TPM) 2.0 option in BIOS/UEFI and enable it as well. Here are the helpful links for ASUS, Dell, HP, Lenovo, and MSI.
If you encounter any problems, try updating your BIOS/UEFI to the latest version or contact Riot Games support for assistance. For more Valorant error fixes and guides, be sure to head over to our dedicated category.