In Minecraft Xray guide, we will explain how to install and download the Xray mod in Minecraft. For the unversed, Minecraft Xray is a mod which allows users to make see-through blocks to find not only diamonds, ores, caves but also mineshafts and more. Minecraft Xray mod will help you locate cool cave systems or even ocean monuments. Without any further ado, let’s find out how to download and install Xray mod in Minecraft.
How To Download & Install The XRay Mod in Minecraft
1. Download & Install Forge
Before downloading and instaling Minecraft Xray mod, it is mandatory to install Forge mod. If you do not know how to Install and Download Forge mod in Minecraft, you can click on the link, which will teach you how to do that. Once’s you learnt how to install Minecraft Forge, now, it is time to learn how to get the Xray mod installed in Minecraft.
2. Download Minecraft XRay Mod

Yes, after installing Forge mod, it is time to download Xray mod. If you do not know how to it, no need to wonder, it is quite easy. What you all just have to do is click here. When you click on the link you will two options Download or Install in the top right corner of the screen, you have to click on the Download button. In a few moments, the latest version of Minecraft Xray mod will automatically be downloaded.
3. Create The ‘.minecraft’ Folder
This might be a little bit complicated step to follow when it comes to Installing Xray mod in Minecraft. In order to install the mod, you are required to get to the ‘.minecraft’ folder. Doing this, you will have to hit the ‘Windows Key’ button which is located in the left bottom of the screen, and the ‘R’ key on your keyboard at the same time. This will open up a program called ‘Run’.
Once the function is open, you just simply have to type ‘%appdate%’ into the search box. This will then open up your ‘Roaming’ app data folder. Here, you will see a folder named ‘.minecraft’. After finding the mentioned folder, you will have to double click on it open. That’s all you have to do.
4. Make Sure You Have A ‘Mods’ Folder
Before we you can process further to Install Minecraft Xray mod, you are required to create a folder to put it. Doing this, you have to find the ‘mods’ folder inside the ‘.minecraft’ the folder we mentioned in Step 3. Once you found that folder, open it, it’s time to finally get the Minecraft XRay mod installed!
5. Install The XRay Mod
Now, you must have an idea of how easy is to install and download Xray mod in Minecraft. Now, you just have to drag and drop the downloaded file. This effectively installs the mod in Minecraft, but you are not done yet. There is still a thing that you need to do before you can start enjoying the XRay mod.
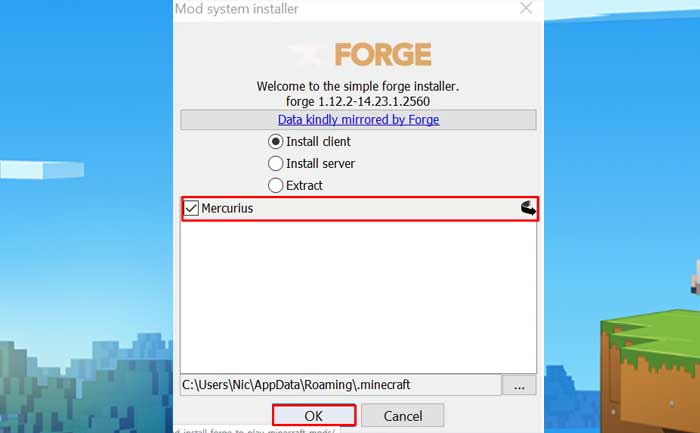
6. Select The Correct Version of Minecraft
You are just about to complete the process. That last thing you are required to do is select the ‘forge’ version of Minecraft you installed in Step 1. In order to do this, you have to open the normal Minecraft launcher and click the little arrow next to the ‘Play’ button. Once you click on the button, it will open all of the Minecraft versions you currently have downloaded on your computer. In this list, find the version titled ‘forge’, and click it. Next, click play, and you are done!
There you have officially installed Minecraft Xray.
Notably, Minecraft Xray is reportedly banned on multiple servers, if you will also get banned if you ever caught using Xray mod. Nonetheless, if you had any issues getting the XRay mod downloaded or installed, please let us know in the comments below.