To Claim Thunderlord in Destiny 2, you must complete the Murder Mystery quest with all three steps. This Destiny 2 Weapon Guide will show you a step-by-step process on how to unlock and claim the exotic weapon. During the Murder Mystery quest line, you are assigned to figure out what happened to Master Ives, the Cryptarch formerly seen in the Reef back in the first Destiny. This quest of Ives’ death will lead you to the Exotic lightning-slinging machine gun from the original Destiny – Thunderlord.
How to claim the Thunderlord in Destiny 2
In order to start the quest, head to Amanda Holliday in the Tower, where you’ll receive Master Ives’ journal. You have to search out the missing pages from Ives’ diary out in the world. So let’s get started with the hunt.
Step 1: the Crytarch’s Journal
The first step is pretty easy and quick to achieve. There are a total of 10 pages to acquire, which can be gained by locating Legendary engrams in various activities. Which includes Gambit, Strikes, the Crucible and all those things you do in Destiny 2. Or else, killing off the strong fallen enemies in EDZ on Earth.
Achieving all the pages should be an easy task if directly head to the EDZ. The ones to look for are the Fallen with orange colored health bars, very well known as Elite bad guys. Pages cannot be acquired from Majors, orange enemies are the ones you need in particular.
Public events are a place to look for to find Elite Fallen to kill the EDZ. You should be looking for the Glimmer Mining event which takes place in several places in the EDZ, which is definitely a promising bet!
In case, you’re tired of roaming around on earth, Cryptarch is another option where you can spend some shards to acquire the Legendary engrams which you need to complete the step. This method should cost you 250 legendary shards if you wish to buy 10 pages for 10 engrams.
Step 2: Hunting The Fallen
As smooth and quick as the first step. Now you return to the EDZ to complete the four Lost Sectors. Once you reach, you need to start with a batch of three: Atrium, Widow’s Walk, and Terminus East. All the three are located in the Trostland area of the EDZ.
The atrium is located inside the church where the Devrim Kay is hanging, Widow’s Walk to the Northwest Cornes of the area, and terminus to the Northeast. As you completely wreck all the three enemies the next step directs you to another Lost Sector, Whispered Falls.
Take the Sparrow and march towards the West to the Outskirts, there you will find the Lost Secure up in the hills in the west end of that area. Make sure you drive to the narrower part of the map to gain access to the Winding Cove.
The next task is to kill the Major in Whispered falls and wait to get summoned by Amanda Holliday to return to the tower. Now, you shall receive new coordinated for the third and last stage of the quest.
Also Read: Journal of the Reef Cryptarch Walkthrough
Step 3: Return To The Cosmodrome
The final step – Once you’re summoned by Amanda Holliday, you will be guided to a teleport in Earth’s European Dead Zone that you should check out. Now that you’ve started the mission towards the final step of the quest, you should move to the East toward the Outskirts. You can find the mission start in the northern part of the canyon in the whispered falls Lost Sector. Reach inside to the teleporter.
Now that you’ve have started the mission warps, you’re back to the Cosmodrome, the original place where the Destiny players first started back at the beginning of the original game, the path of the first Destiny mission. Make sure you keep following the markers till you reach inside, where you should face a tough battle with a Fallen Captain named Kikliss, Murderer, along with umpteen of minion enemies.
The toughest part of the quest is here, keep your best guns loaded with you and keep marching. As you fight and injure the Kikliss, a giant Servitor will join the battle, making it more exasperating for you. Maintain a safe distance between you and the Kikliss when you’re fighting the Servitor, as it has the power to make the enemies powerful and indestructible – even the boss.
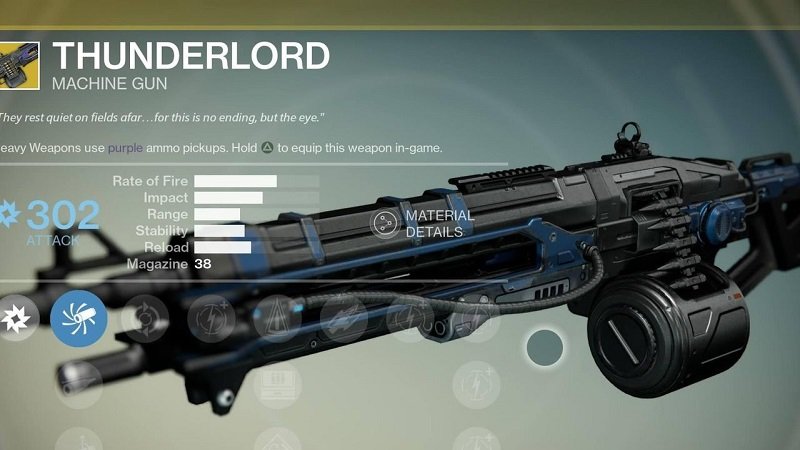
Once you’ve killed the Servitor, killing Kikliss should be much easier. After which you shall be prompted back out of the Cosmodrome. Amanda Holliday will give you a message hinting that it could be your final moment in the Cosmodrome, with an objective prompt reading, “Leave The Cosmodrome?” Hinting there might be additional secrets to discover in Russia, make sure you’ve gone through the looking around carefully. You will be prompted to return to Holliday in the tower if you approach the teleport near where you begin. The reward you will receive is a “trinket”, you may have guessed it already, the sparkling machine gun Thunderlord. This exotic is added to your Heavey weapon slot, carrying the “Reign Havoc” perk, causing lightning strikes from the sky when you use it.
Check our other Destiny 2 Guides, Tips and Tricks only on Gamer Tweak.