Roblox is undoubtedly one of the most popular gaming platforms across the world. It might have millions of daily active users but only a few are aware to make clothes in Roblox. If you too are one of those players then don’t worry, in this guide, we will walk you through how to create clothes and sell them to earn a lot of free Robux.
If you are an ardent Roblox lover then you must know the importance of having incredible clothes. For the unversed, it is a cloth that differentiates you from the rest of the players in Roblox. If you are having difficultly creating a beautiful dress then keep reading this post.
Roblox allows you to create a shirt, T-shirt, and pants. It should be noted that you can’t create a shirt and pants in Roblox without having its Premium Membership. Creating a t-shirt, on the other hand, does not need you to have a Premium Membership in Roblox.
How To Create Clothes On Roblox?
Explaining how to create clothes in Roblox is a bit complicated. However, we will explain each and every step in the simplest way possible. Those who want to learn how to make clothes on Roblox should follow these simple steps:
Select and open the template that you have chosen for your cloth. The template will help you design your cloth in terms of the colors and the position of the character.
Shirt Template:
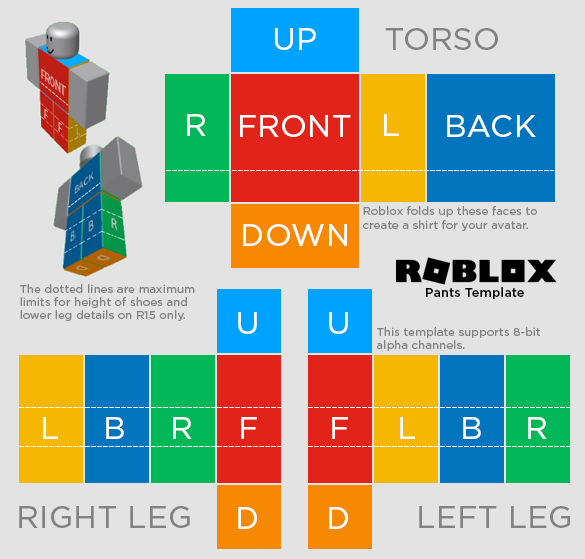
Pant Template:
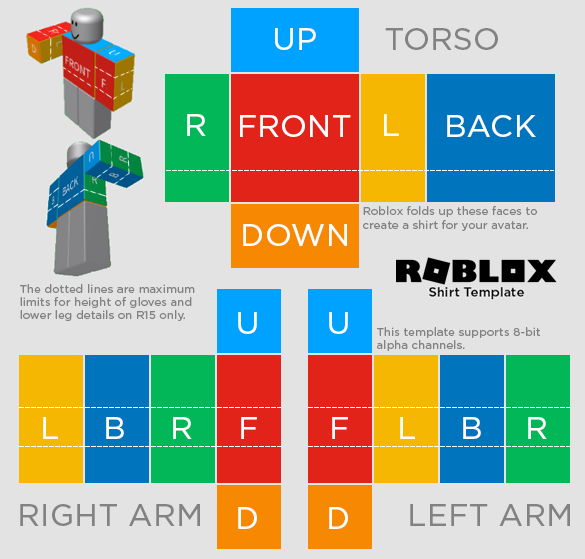
Here are all colors of the template and what they describe:
- Light Blue: It shows a part of the shoulder and the shirt’s upper look.
- Dark Blue: It shows a part of the back and shirt’s back look.
- Red: It shows a part of the chest and arm’s front look.
- Green: It shows a side look of the shirt and arms.
- Yellow: It shows the inside of the arms.
- Orange: It shows a part of the arms from below.
Here are the sizes for each template part:
| Shape | Size (width × height) | Clothing Parts |
|---|---|---|
| Large square | 128 × 128 pixels | Front and back of torso |
| Tall rectangle | 64 × 128 pixels | Sides of the torso (R, L) Sides of arms/legs (L, B, R, F) |
| Wide rectangle | 128 × 64 pixels | Top and bottom of torso |
| Small square | 64 × 64 pixels | Top and bottom of arms/legs (U, D) |
Note: Make sure the dimension of your image should not be exceeded the exact dimension — 585 pixels wide and 559 pixels tall — or else, you would not be able to upload your avatar on Roblox.
How To Upload Clothes To Roblox?
Uploading clothes to Roblox is straightforward. To do upload it to Roblox, you simply need to go to the ‘Create’ menu and then search for the ‘Shirts’ option. There, you will see a box where you will have to put a name.
Now, click on the ‘Browse’ button and find the folder where you have saved your designed item. Select that item and upload it to Roblox. Once uploaded, you can now head to the character editor and equip the garment you have made.
How To Sell Clothes On Roblox?
Once you have designed your clothes in Roblox, you have an option to sell them for a good price. To sell clothes in Roblox, you need to head to the Create menu and select Shirts. There, you will have all of the shirts you have designed.
When you click on a gear showing at the far right side of each row, you will be taken to a page, where you can put a description and price that you want a specific shirt to be sold. Make sure to put a price between 10 and 50 Robux.
Irrespective of the price you put in, you will only get 70% percent of the amount or the remaining 30% will go to Roblox.
That’s everything you need to know about how to make clothes, upload, and sell on Roblox.