Edlen Ring gives you the freedom of finding your own path and unraveling the story yourself. But there are areas you are better off avoiding in the beginning especially if you are low level. For example, going East from your starting location in Limgrave is a no-no, if you don’t want to make your game difficult right from the beginning. On the opposite spectrum of things, there is a specific path you can follow to get powerful right in the beginning. So today we will look at what we believe is the best starting path/progression route in Elden Ring to get OP early.
Elden Ring Progression Route
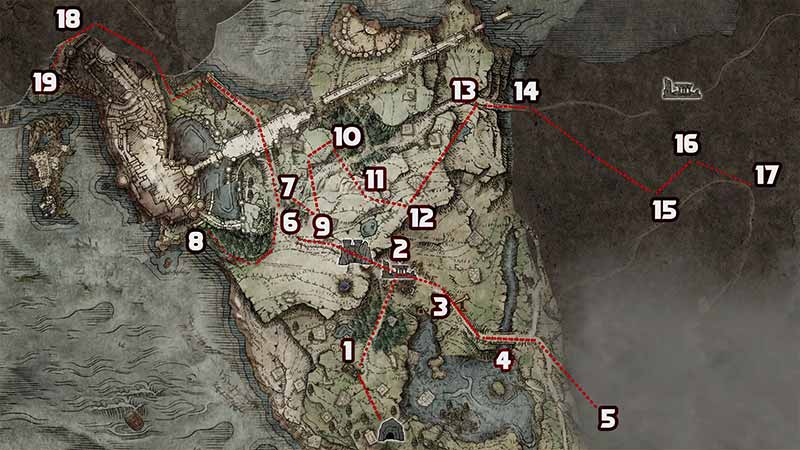
To get OP early in Elden Ring you need to follow a specific Game Progress Route to get +4 Weapon, tons of runes, double healing, powerful spirit companion, improved armor, and unlock all important in-game features early. All of these can be done without even killing a single enemy as per the path curated by YouTube channel Boomstick Gaming. We used the path suggested by him, and we can vouch that his video works 100%.
We will break down the locations with what you earn from each of the locations and also provide screenshots of the game progress path for your convenience here. But please make sure to check out the original video we have linked here too. It’s visible that Boomstick Gaming has put lots of effort into finding the best route possible. So let’s check the path below:
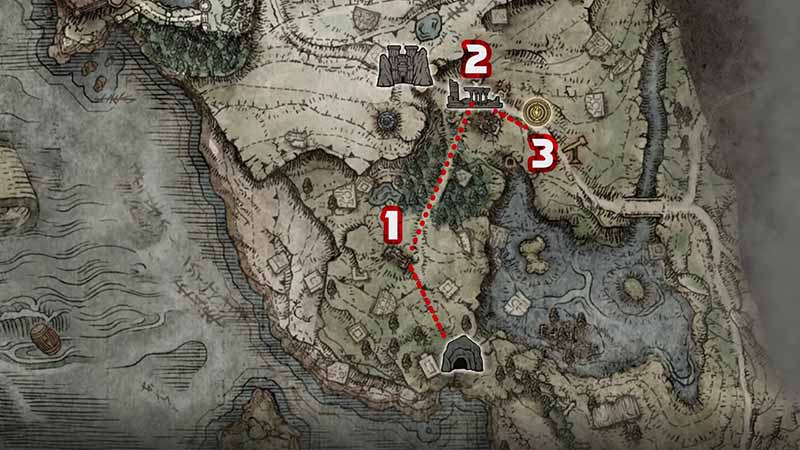
- First, avoid the “Tree Sentinal” boss and sneak past him
- Now go towards the “Church of Elleh”
- Pick up “Golden Runes” from outside the church
- Go inside, and pick up the “Smithing Stone”
- Now touch the “Lost Grace Site”
- Now go follow the North-East road
- You will see a soldier with a torch patrolling this road
- Keep going along the road to reach “Gatefront Ruins”
- From the big pillar in the location, collect the “Limgrave, West” Map
- Now go to the southeast and rest at the “Agheel Lake North” site of grace
- A cutscene will start now with Melina
- You need to discover 3 Sites of Grace to get this cutscene
- Accept her help, and get the “Spectral Steed Whistle“
- Now you can use your horse mount to make traveling easier
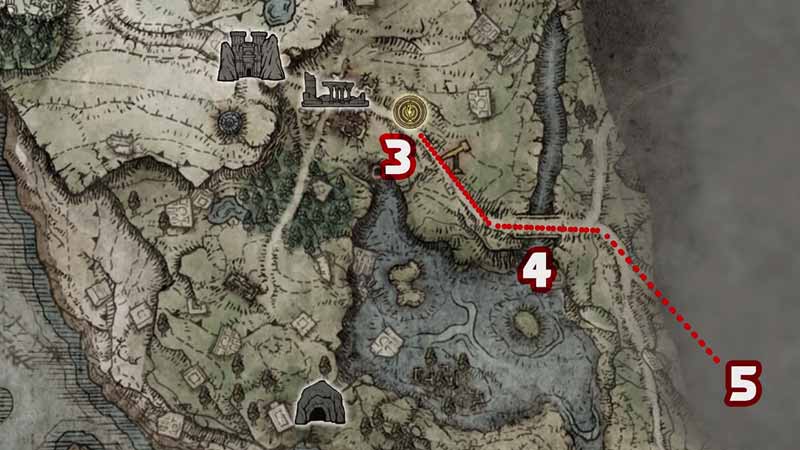
- Follow the main road to Southeast
- Once you reach the stone bridge, collect a “Smithing Stone”
- Now go to location “5” on the image
- Here you are doing some grave robbing to get lots of “Golden Runes”
- Once done, fast travel back to “Agheel Lake North” site of grace
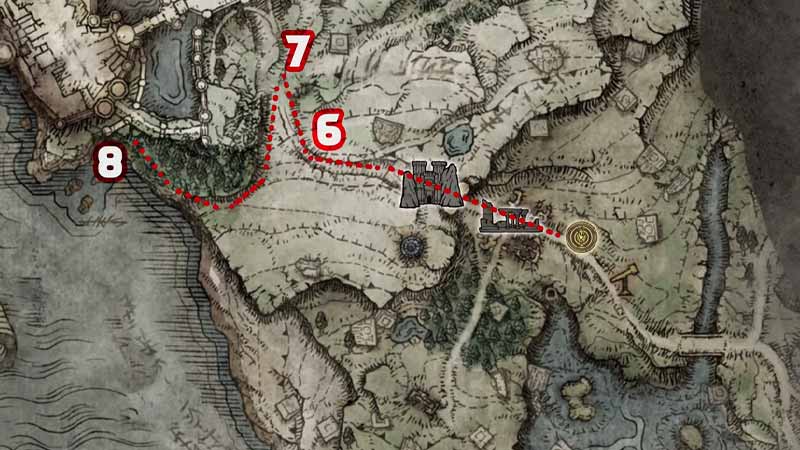
- Now follow the path to locations 6, & 7
- Along the way, you will get another “Golden Seed”
- Rest at “Stormhill Shack” Lost Grace Site
- Select “Flasks” then “Add charge to flask”
- Now use one Golden Seed to increase your number of headling flasks to 5
- From the same location collect the “Stonesword Key”
- This you will get by pillaging the corpse remains
- Now enter Stornhill Shack
- Talk to Roderika (Woman with a Red Hood)
- Talk to her 3 times to get “Spirit Jellyfish Ashes”
- Go to location no 8 on the map, and collect Smithing Stone from a gravestone
- Now fast travel back to Stornhill Shack
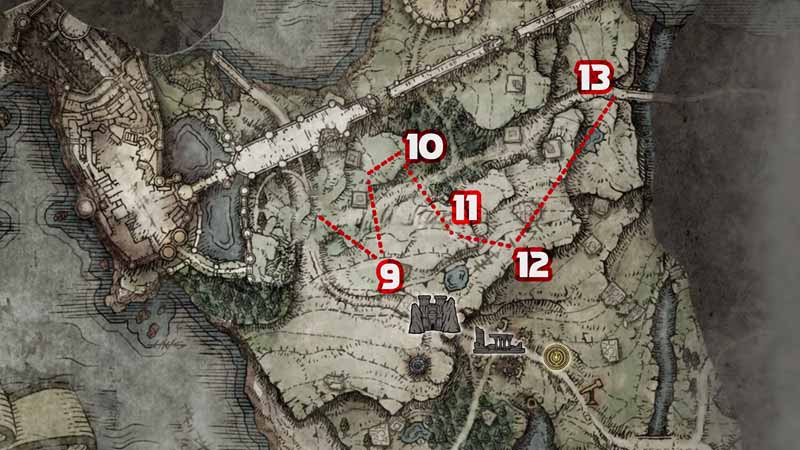
- Collect more “Smithing Stones” from behind the shack
- Now go Northeast to the cliffs
- You will find a “Strength-knot Crystal Tear”
- Go south to find more graves to rob “Golden Runes”
- Move to the next location on the map to get rank 2 Smithing Stone
- Now go to location no 13 on map
- Here you will find the “Saintsbridge” site of grace
- Collect a “Smithing Stone” from the bridge
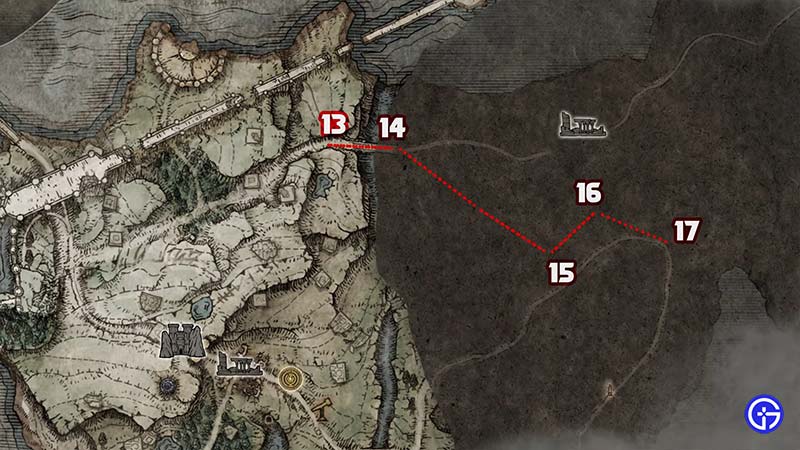
- Now keep following the locations in the video, and get more upgrade items
- You will collect level 2 Smithing Stone
- And finally, reach “Third Church of Marika”
- There you will get a “Sacred Tear”, “Crimson Crystal Tear”, & “Flask of Wondrous Physick”
- Now rest on Third Church of Marika site of grace
- Use “Sacred Tear” to increase the amount of HP/FP replenished by flasks
- Now select the “Mix Wondrous Physick” option
- Add “Crimson Crystal Tear” & “Strength-knot Crystal Tear”
- Now this will “Restores half od max HP” & “Temporarily boots strength”
- Fast travel back to “Stornhill Shack” site of grace
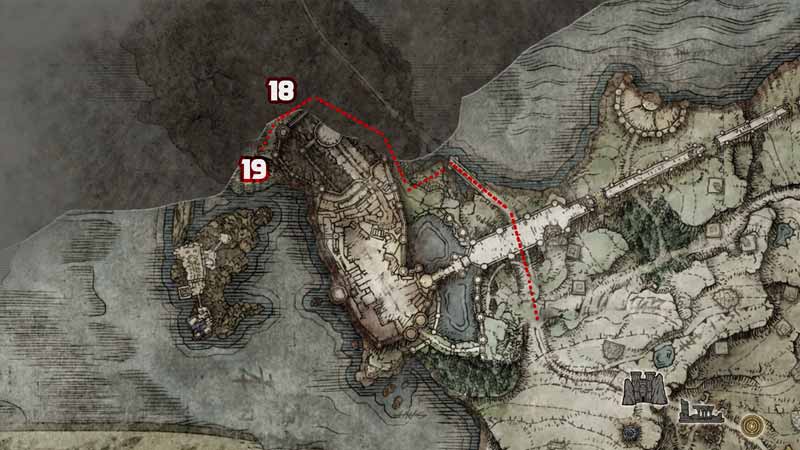
- Now got the location market on the map
- You will meet “Palm Reader” on the way
- Go down the debris from the bridge end
- Follow a secret path to the right
- You will reach “Liurnia of the Lakes” site of grace
- Activate it, and go to the church in front of you
- Collect the “Sacred Tear”
- Use the “Sorcerer Thops” shop to buy any speels if needed
- Go back to the “Liurnia of the Lakes” site of grace
- Rest there now, and Melina will appear
- She will invite you to the “Roundtable Hold“
- Use the “Table of Lost Grace”
- Now select “Increase amount replenished by flasks”
- Use the Sacred Tear you just found
- Consume all the Runes items
- You will have over 10K+ runes now
- Go to the “Smithing Master Hewg” (blacksmith)
- Use all the Smithing Stone to improve your weapon to level 4
- Now interact with “Twin Maiden Husks”
- Buy all the items they have for sale
- This includes “Lone Wolf Ashes”, “Spirit Calling Bell”, “White Cipher Ring” & “Blue Cipher Ring”
- Open inventory and use “White Cipher Ring”
- Now a hunter will automatically come to your aid if you are invaded
- Talk with both Roderika & Blacksmith, back to back
- Then load the map again by traveling back to the Roundtable Hold
- You will get Roderika as your Spirit Tuner now
- She can now level up your summons
- Fast travel back to “Stornhill Shack” site of grace
- Collect “Golden Seed” from the location where Roderika was sitting
- Use that to increase your 6 flasks to +2
- Fast travel back to “Church of Elleh” on the map
- Buy the armor from the seller there
- Use the site of grace to level up your character with all runes you have left
- Now finally you have an OP character without killing a single enemy in the game
Check out the original video from Boomstick Gaming here:
That’s all about the best starting path in Elden Ring to get OP early. If this article helped you, make sure to explore our Elden Ring category for more tips, tricks, and hidden secrets!

