The Elder Scrolls V: Skyrim is one of the most loved games in recent memory. It is truly a timeless classic. Released back in 2011, the game was praised for its immersive story and breathtaking gameplay. One of the reasons that increases the replayability factor of the game is the use of mods. The developers, Bethesda Game Studios made the codes accessible to basically anyone. Several modders have ensured that the game remains evergreen for years to come with a wide range of mods to choose from. However, you should know the right way to get them. So, without further ado, here is how to manually install Skyrim mods.
How to Install Skyrim Mods
While you can always take the assistance of a mod manager, you will make things harder on yourself eventually. This is because these softwares install the entire mod onto your PC. If you have more mods than your system can handle, you are likely to encounter bugs and frequent game crashes. This is why you should manually install the Skyrim mods on your PC. Since it’s a little difficult, we will show you how to do it in a few easy steps:

- After downloading your favorite mod, extract it using a tool such as WinRAR.
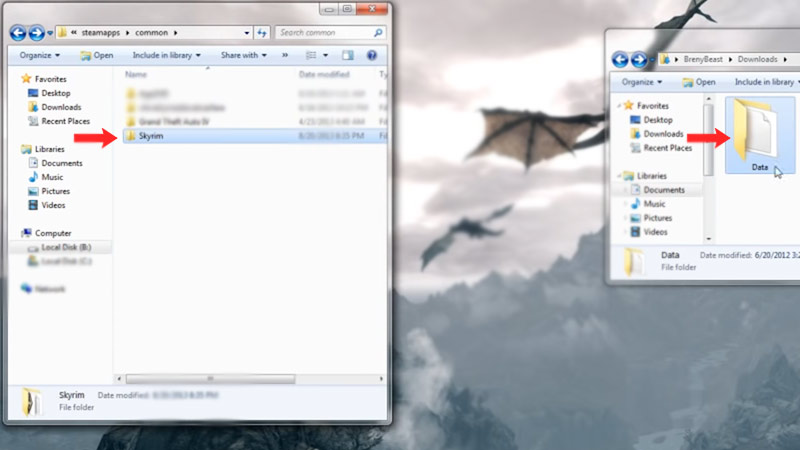
- All your mod content will be stored in the “Data” folder. Drag the entire folder and search for the default location of your Steam app.
- Now, head to Steam>steamapps>common>Skyrim
- Move the “Data” folder in your “Skyrim” folder.
- At times, your mods won’t come in a dedicated “Data” folder. In such cases, you will have to drag the mod files and move them to the “Data” folder in “Skyrim”
How to Find Skyrim Mods
For this, you will have to search for Skyrim Mods on the Nexus website. It is the best place to find Skyrim mods. You will see a huge list of all available mods on the page. Simply choose the ones you want and prepare for downloading.
That’s it, you have successfully learned how to manually install Skyrim mods. If this guide did help you, check out for more such content on our Skyrim page.

