With enhanced graphics and enthralling in-game elements, this game has all the brutal action you need. Take on all the plague enemies you encounter and do not expect any mercy. Besides this, there are several types of mission that keeps you engaged throughout the session. One such interesting mission in Warhammer 40K Darktide is Espionage. Wherein, you have to tamper with the enemy’s intel by uploading false data into their system. However, do not expect it to be a sneaky Hitman-type mission as you will find chaos in each corner of this game. If you are unable to get through this mission, this article got you covered. Check out this guide that features the steps to complete the Espionage mission in three steps.
Steps to Complete the Espionage Mission in Warhammer 40,000 Darktide
There are several objectives showing up on the screen while completing this mission. But, we will be breaking down the entire mission in a few steps highlighting the major objectives. Here’s how you can easily complete the Espionage in Warhammer 40K Darktide.
Deploy Servo Skull to find the Cypher Ident
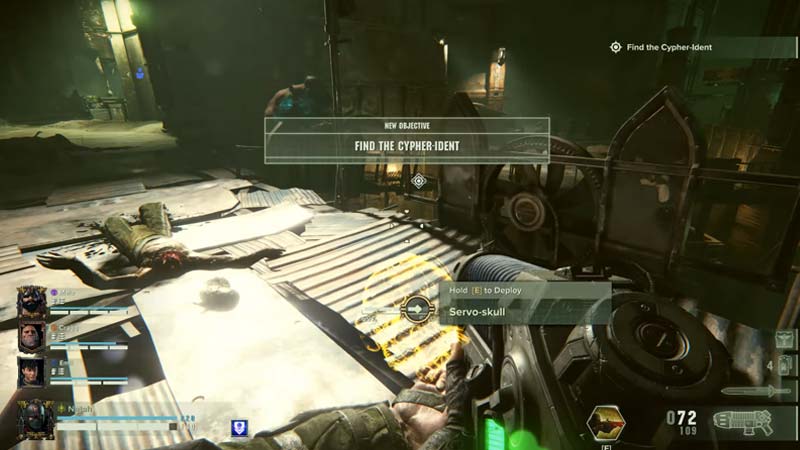
The very first objective that shows up while attempting to complete the Espionage is reaching Ragtown. Once you get to the Ragtown, proceed towards the Ragtown Bazaar. Also, do not forget to open crates and obtain precious Ammos as you are going to encounter hoards of enemies ahead. Upon reaching the Ragtown Bazaar, kill a bunch of enemies and Deploy the Servo Skull by getting closer to the marked location. Further, the Servo Skull will begin to float in the air and you have to follow it. The sole reason for this is to find the Cypher Ident. Once the Servo Skull stops, use the Auspex to scan the room and obtain Cypher Ident by following the Green Orbs or Bodies. After this, we can now proceed to the second main objective while completing the Espionage mission in Darktide.
Disable & Interrogate the Security Stacks
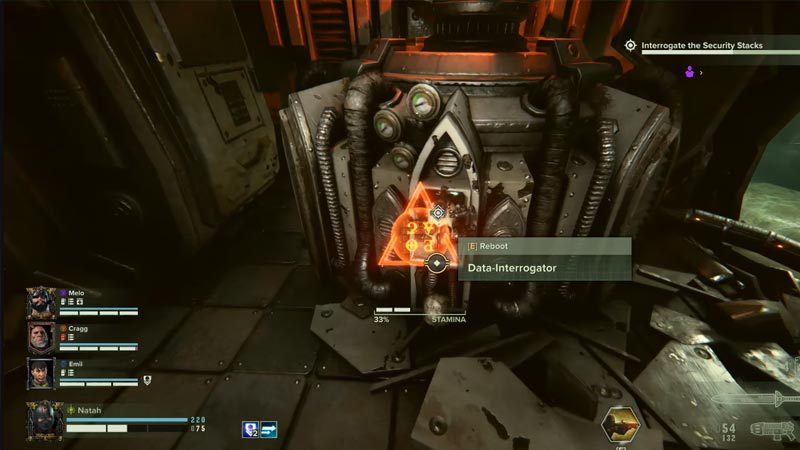
Once you have obtained the Cypher Ident, use the Freight Elevator. Make your way into the Vigil Station Oblivium to upload the false data into the Cogitator Array. This is not as easy as it sounds because you will be obstructed by the Security Stacks in the area. Hence, your second main objective while completing Espionage mission is Disabling and Interrogating the Security Stacks in Warhammer 40K Darktide. For this to happen, simply interact with the marked terminals. There are multiple terminals that you need to Interrogate using the Data-Interrogator. Meanwhile, the data is being interrogated, protect the area from the incoming enemy forces.
Upload False Intel in Cogitator Array – Final Objective in Espionage Mission of WH40K Darktide
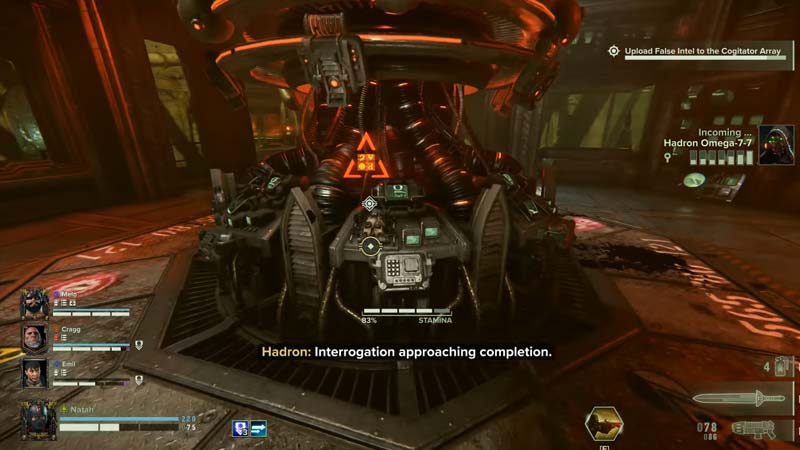
Once all the Security Stacks are interrogated, head over to the designated location. In this final task of Espionage in Warhammer 40K Darktide, use the Data-Interrogator again to upload false information into the enemy’s system. It will take a while for the data to upload. In the meantime, decimate all the enemies approaching you through the bridges. Later, when the job is done, exit the area to finally complete the Espionage.
That’s all covered on how to complete the Espionage mission in Warhammer 40K Darktide. If you found this article helpful, then make sure to check out our other guides on WH40K Darktide.