While playing Osu! you can have even more fun when you download and install skins. The default skin is considered bad by many players. It is good for learning the game but you should definitely change it. And you will be surprised how easy it is to import skins for this game. Not to mention the plethora of options you get as well. So without further ado let us check how to download and install Osu! skins, also learn to change and delete them.
How to Download Osu! Skins

There are multiple sources from where you can download Osu! skins. But for this guide, we will check out Osuskins.
- Search for Osu skins on google. Click on the first site that is osuskins.net
- Here you can browse the different skins or search for a specific skin. You also get multiple filter options like:
- Modes
- Standard
- Mania
- Taiko
- Catch
- Players
- Sort by
- Random
- Newest
- Views
- Downloads
- Name
- Time
- All Time
- Past 24 hours
- This Past Week
- This Past Month
- Past Year
- Order
- Ascending
- Descending
- Modes
- You scroll through the skins to find the skin you want, and once you do click on it.
- It will open up the skin page, on the top right side, you can find a download button. Click on it.
- Wait for the download to complete, once done you will get the skin.
Now, here is how you can install it.
How to Install Osu! Skins
Importing skins in this game is very easy.
- In order to install a skin, you simply have to double-click the skin you previously downloaded.
- Treat it like a regular app that you would open.
- This will launch Osu! and apply the new skin as your current skin.
How to Change Skins

- Launch Osu!
- Click on the large Osu! button at the center.
- It will give you four options Play, Edit, Options, and Exit.
- Click on Options.
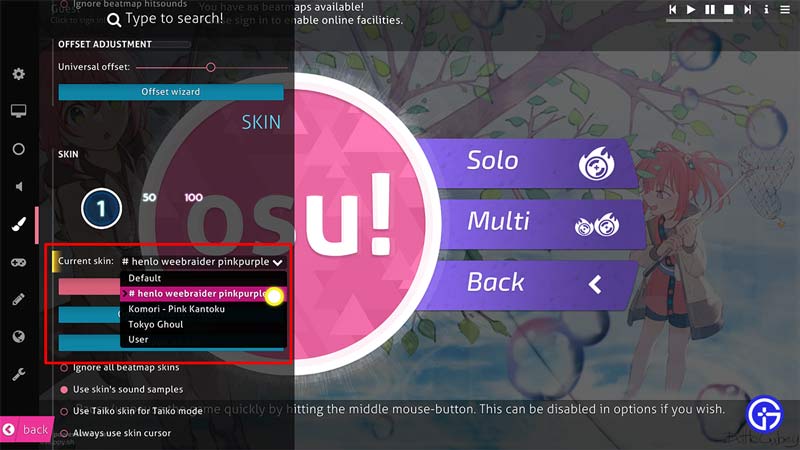
- On the left side, you get several options, click on Skin.
- Click on the current skin dropdown.
- From here choose the skin that you would like to use.
How to Delete Skins

If you decide that you no longer want to use a skin then you can remove it from the game. You can do that by deleting the specific skin folder.
- Launch Osu!
- Click on options and go to skins.
- Set the skin that you want to remove as your current skin.
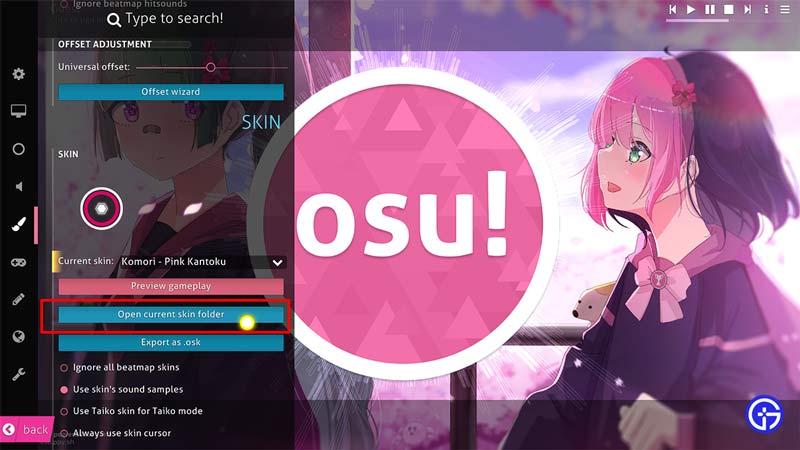
- Then click on the Open current skin folder.
- This will launch File manager with the current skin folder open.
- Go one step back in the path and delete the entire folder.
- For most users you can find your skins in the following path: C:\Users\username\AppData\Local\osu!\Skins
- From here delete whichever skin folder that you no longer want in the game.
- Relaunch the game and you will no longer get that skin under the change skin options.
That covers this guide on how to download & import skins in Osu! and also how to change and remove them. If you found this guide to be useful and need help with other games don’t miss out on our other guides right here at Gamer Tweak.

