Accent Walls and lighting fixtures that may be hung from the ceiling are just some of the new features in the new Animal Crossing New Horizons 2.0 update. This is in addition to the game’s other recent developments, which players have just begun to experience. And as with any updates, many are having problems finding out how to get and remove Accent Wall in Animal Crossing New Horizons (ACNH) because it is a new feature. So today we will help you in solving this.
How to Get Accent Wall in Animal Crossing New Horizons?
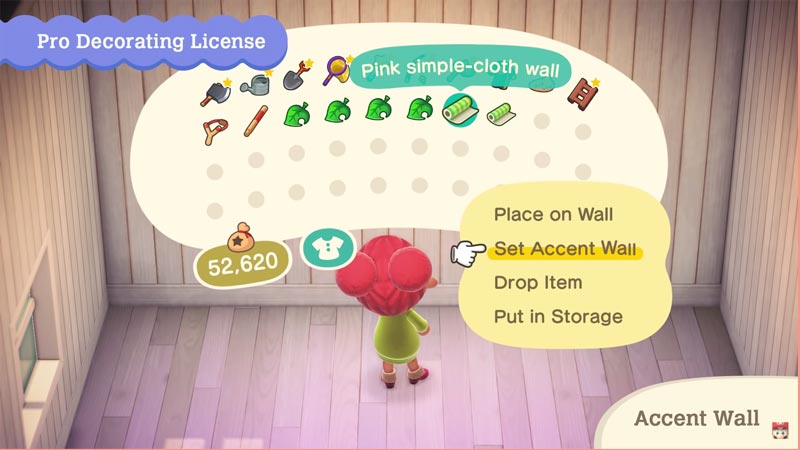
Here’s how to get an accent wall in Animal Crossing New Horizons(ACNH):
- Purchase a Pro Decorating License
- You can get it for 2,500 Nook Miles in Nook Stop vending machine.
- Buy or add wallpaper to your inventory.
- You can also do this in Decorating Mode.
- Go to your room.
- Start Room Editing Mode.
- Pressing the “+” button to toggle between walls.
- Now press the “X” button.
- Now you have successfully added an Accent Wall in ACNH.
How to Get Rid of and Remove Accent Wall in ACNH?
- You can repeat the exact step as you used to apply Accent Wall in ACNH, to remove or change them too.
- You next need to press the same “X” button while near the wall.
- If you having trouble with this, check out this YouTube video from DrDoomShow below:
This new option enables gamers to utilize additional wallpapers, however, it does not accommodate a variety of wallpapers in a room. Just one wallpaper can be used per room until Animal Crossing New Horizons’ recent update, but that amount has been increased to two. However, gamers who want to employ many accent walls in the same space will be disappointed. The Pro Decorating License is a completely new mechanism that the developers have included in Update 2.0.
That’s everything you need to know about how to get and remove an Accent Wall in Animal Crossing New Horizons, make sure to check out our ACNH Guides for more tips & tricks like this.